![]() |
| 4th grade cubes One part of shapes review for MCAS |
Monday, March 11, 2013
Keith Haring cubes
Labels:
4th grade,
cube,
Keith Haring
Sunday, March 10, 2013
Shapes for MCAS review in Art Class!
The MCAS is coming up soon and we all try to pitch in and do our part to make sure students are ready for THE Test. A few years ago the Math Coach mentioned to me that the 4th graders were not as proficient as they needed to be with their knowledge of shapes. Sounded like a great way for me to connect in the art room and perhaps enhance learning about shapes. I spend a lot of time with shapes with Kinders but only touch on them in the years that follow. The first year of this focus I visited the die cut machine and discovered several shape dies were available. With card stock in hand, I cut cylinders, cubes, rectangles and pyramids for all the 4th graders to assemble into 3D shapes. It was an off the cuff lesson without much time for pre-planning so I just had them to decorate the flat surfaces prior to assembly. A basic review of Math terminology followed as discussions included the number of faces, angles or vertices's, and how the shapes might appear in common applications. That was then but this year I have taken a much different approach. The sizes of the 3D dies were pretty limiting and I wanted to incorporate a more artistic approach to the shapes. Student would begin with the cube. Using the die cut shape as a guide, I easily designed a larger version that I could memo-graph for the students to work with. The lesson incorporated an introduction to the works of Keith Haring. Haring is always one of my 4th grade favorites but I've always used his style in 2D work. Students have drawn a Haring style work on each face of the cube and added color with water based markers prior to assembling. We again have talked about all the Math concepts of the shape and applied common uses to the cube outside of it being an attractive artistic form. These measured about 3", think I will go bigger next year. Here is one I found on the Internet that will help with this process. I'll post some pictures of student works this week.
In the style of
Romero Britto -
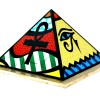
Next came the pyramid. This required a lot more pre-work on my part. I found a tracer in the file cabinet at one of my schools probably left behind by a previous occupant. It was a bit tattered and worn but I was easily able to use it and create a new tracer. The base is a square measuring 7" on all sides and the top of the pyramid measures 7 1/4 inches above the base. Next year I might go for a smaller one but I know I can use this one to help me as I create a new tracer. I had received a donation from a local paper company employee of some beautiful paper that is a weight just lighter than card stock so is a bit easier to fold and work with but very stable and strong. I was able to place the pyramid tracer on the paper 3 times. I've spent my weekend tracing about 135 pyramids and adding the score lines where the tabs will bend back for gluing. I only did the tracing because I did not want to waste this beautiful paper! I cut them apart, however, students will do the fine cutting. I wanted to have the students learn about a new artist, preferably someone living. While scrolling on the Internet, I came across a piece of art in the shape of a pyramid by Romero Britto and knew I had found the subject for the pyramid. I had ordered sets of watercolor pencils and decided this might be a good time to bring them out. I wanted bold color and considered tempera but thought the paper might not be well suited for that use. I think the watercolor pencils look beautiful and am excited to see how the 4th grade projects turn out. I think these will take a few weeks. The above steps are my example and trial to make sure this is a doable project.
![]() |
| Romero Britto's pyramid |

In the style ofRomero Britto -
Next came the pyramid. This required a lot more pre-work on my part. I found a tracer in the file cabinet at one of my schools probably left behind by a previous occupant. It was a bit tattered and worn but I was easily able to use it and create a new tracer. The base is a square measuring 7" on all sides and the top of the pyramid measures 7 1/4 inches above the base. Next year I might go for a smaller one but I know I can use this one to help me as I create a new tracer. I had received a donation from a local paper company employee of some beautiful paper that is a weight just lighter than card stock so is a bit easier to fold and work with but very stable and strong. I was able to place the pyramid tracer on the paper 3 times. I've spent my weekend tracing about 135 pyramids and adding the score lines where the tabs will bend back for gluing. I only did the tracing because I did not want to waste this beautiful paper! I cut them apart, however, students will do the fine cutting. I wanted to have the students learn about a new artist, preferably someone living. While scrolling on the Internet, I came across a piece of art in the shape of a pyramid by Romero Britto and knew I had found the subject for the pyramid. I had ordered sets of watercolor pencils and decided this might be a good time to bring them out. I wanted bold color and considered tempera but thought the paper might not be well suited for that use. I think the watercolor pencils look beautiful and am excited to see how the 4th grade projects turn out. I think these will take a few weeks. The above steps are my example and trial to make sure this is a doable project.
Friday, March 8, 2013
Some Finished Clay!
![]() |
| Bowls, cupcakes, animals and Mustache?! |
![]() |
| Plates and tiles |
![]() |
| Misc creatures, trees and pizza! |
![]() |
| The finished Pick and Draw heads |
![]() |
| Vases from the ideas of Mrs. Carter at Its Art Day |
Monday, March 4, 2013
Thinking of Spring with Kindergarten
Lets make Rabbits. I've used this book in the past as a collage project with Kinders. It's a cute little book. Next the students traced the rabbit onto blue constructions paper near the bottom of the paper using a white crayon. Using construction paper crayons, students created grass remembering to color in a top to bottom motion to create the appearance of deep grass where the baby bunny might be hiding. Students used several shades of green along with brown and gray as they colored their grass. Flowers were added growing up out of the grass and around the rabbit. After all coloring was completed, students used white tempera and a small white sponge to "hop" paint their rabbits. Constant reminders to "hop" with their sponge were given during this time. Once the paint had dried, pink poms and googly eyes were added to complete the picture. These turned out really cute and are so much more appropriate as we look forward to the arrival of Spring! A larger white pom could be added to enhance the tail as well.


Saturday, March 2, 2013
Friday, March 1, 2013
It's Super Hero Day!
Today is Read Across America and Super Hero Day at one of my schools. Ty Allan Jackson is our guest this morning and I think I am more excited for the assembly than the kids. I love to meet local authors and hear them share their work. So today I am Super Face Painter Woman making all children happy where ever she paints! Here I am, should be a fun filled day!
Thursday, February 28, 2013
Adobe Houses out of clay
Our last day of the after school clay program was today and we tied it all up by glazing and painting all the completed projects. The family art show won't be for a few more weeks, lots of glaze firings need to occur first. Here are the finished adobe houses. We use acrylic paints on the adobe. I've stacked them together to make them look more like a real adobe community.
Labels:
Clay
Subscribe to:
Posts (Atom)


