Pages

Thursday, January 31, 2013

Pick and Draw with clay

Pick and Draw Clay heads
There were a few post earlier in the year on several blogs about the "Pick and Draw" game from Rich Davis.  I decided to order a set and couldn't wait to try it out as a clay game in my after school program.   Today was a our big game day.   I drew the cards pictured here and projected them with my Elmo so all the students in the program could view them at the same time.   It was fun to see the different interpretations by the students in the program.  Here are just a few.  I'll update you after we have added glaze in a few weeks.  For some of them we added a few holes in the top of the heads so that a hanging wire can be added.   Other students preferred to view their heads as an ornamental piece to be place on a table for viewing.  The cards were fun, I'll look forward to using them in other ways in my classes.

Tuesday, January 22, 2013

Defining space with Kindergarten students


My Kinders created these cute little drawings today as we talked about space and drawing things near and far. Everyone followed along to draw the road and the parallel lines with triangle trees then they were given creative liberty to finish their composition. I love the endearing quality of kinder work.
Kindergarten lesson on space (near and far)

supplies: pencils, crayons, 9x12 white paper
vocabulary:  vertical line, diagonal line, triangle, color (value) dark to light, pattern

Define and discuss the use of space in art. 

With pencils only, model as students draw a diagonal line from the top right corner to the lower left corner of their paper. Draw a second diagonal line beginning at the top right corner and going down to about the middle of the bottom of the page. Place 5 vertical lines across the left side of the paper extending from top edge of paper to one of the diagonal lines and draw triangles for trees on each line. The triangles should start small at the top of the page and get larger as they go down the page. Draw a large tree near the bottom of the page on the right side. It can over lap the road (the v shape made using diagonal lines). Have the students to select 3 different shades of green color, beginning with the darkest green, they should color the triangle on top, use the next darkest color for the next one down and the lightest green for the third tree down. Tell them to continue coloring to create a pattern. They should color the sky blue or gray( for winter) the road a color of their choice, and the ground a color of their choice. Encourage them to add details of their choosing. They could add birds, cars, people etc.


Monday, January 21, 2013

Your wish just came true!

IPEVO Wishpool
Dear Kim,
Congratulations! Your wish story has touched every Wishpool team member and thus selected as one of the receivers for this month's gift.
IPEVO Point 2 View USB Document Camera Qty: 1
Please continue your hardwork and come back and share with Wishpool and other wish makers how are the products fitting into your class.
Regards,
The IPEVO Wishpool Team
http://www.ipevo.com/wishpool
 
I'm sure you can relate to my excitement when I opened this email.  I can't wait for it to arrive and to learn how to use it in the classroom.  Check out IPEVO to make  your own wish.
 
Using my new document camera from Ipevo on February 5th to demonstarte a project
 

Face on Stamp app for iPads

I was trolling new to me blogs this morning and stumbled upon the blog It is Art Day! from Mrs. Carter's elementary classroom. Follow her here.  She mention a new application she had discovered for portraits in the elementary classroom and I had to check it out.   I'm not sure how I will incorporate it into my classroom due to the fact I will have to solve the logistics of being able to use the iPads first.  The app is easy and will most definitely be a hit with the kids!  Here is my first attempt at Face on Stamp.  My immediate thoughts are maybe using it with a unit on Andy Warhol and create the identical stamp in 4 different colors and creating a 2x2 composition.  Any body else have any thoughts?

Friday, January 18, 2013

After School Clay Program


 A few photos from the afterschool program.  Students have created tiles, adobe houses, cupcakes, and birds along with some free form objects of their own choice.  We have three more weeks of the program, one more weeks left to create!


Thursday, January 17, 2013

Ocarina Tools follow-up

The tools work great!  I actually had some students succeed in making a whistle on their first try.   If you make clay whistles, definitely take the time to sand down some craft sticks for these easy to make tools.  They are real timesavers!  (my orginal post was 1/7/2013)

Wednesday, January 16, 2013

Can't

Found this on pinterest and had to share it.   I always tell my students that "Can't" is a bad word in the Art Room!

Monday, January 14, 2013

The march of the clay owls


Completed 2nd grade owls, drying in preparation for the kiln.


Sunday, January 13, 2013

Wrapping your clay piece

Here is the poster I created to remind my students the steps to wrapping their clay projects for storage from week to week.


Monday, January 7, 2013

I'm making tools to create Ocarinas

My fifth grade students are beginning the making of ocarinas today.  I discovered a post on Ceramic Art that I will share with you here.  How to make an ocarina.  The tools are made with a simple craft stick with the end sanded to an angle.  Two sticks are used to create the blow hole for the whistle.  I gave it a try and the tools are very fast and efficient.  I'll let you know in a few weeks how it goes with the 5 th graders!

Sunday, January 6, 2013

A project that impresses


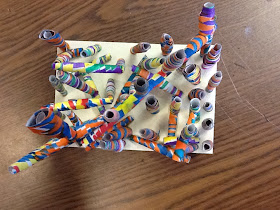
            Sol LeWitt inspired 3D sculptures

This is one of my favorite projects and it morphed out of a project on color theory.  Each year I have my fourth grade students demonstrate an understanding of Primary, Secondary, Complementary and Analogous color schemes by creating pattern papers.   After visiting a Sol LeWitt exhibit at Mass MOCA a few summers ago, I integrated the works of Sol LeWitt into the lesson, sharing with the students LeWitts's ability to create amazing works of art with very
basic color combinations.  We study his transitional styles and talk about his integration of math into his work.  Lastly, we share the fact that LeWitt creates the ideas for his works but the process is actually completed by other people.  The students find that to be a very fascinating fact.  
Last year I decided to take the papers and use them to extend the lesson and the sculptures are the end produce.   The papers are cut into triangular shapes, I created tracers that are used by my students.  The triangles are traced on the back of their paper and then cut apart.   Using a wood stylist, the triangles are then rolled into paper beads or tubes.   The tubes are then   glued to form angles.  So we have transgressed back to a math connection with the project. Taking two of the tubes at a time, students glue them to form right angles, acute angles and isolates triangles.  Every connection must form an angle.   The angles are glued to a poster board base about
4 1/2 x 6".  The sculpture is built both up and out with the focus on angle.   Anything is acceptable as long as it forms an angle.  Here are a variety of the completed projects.

Saturday, January 5, 2013

Let the Clay Projects Begin!


We've been back to school for three days and they have been so hectic!   Setting up to begin clay work takes a tremendous amount of prep time but I am finally ready to go.   Fourth and Fifth grades have begun to sketch their project ideas and break down their work into the shapes they will need to construct their clay projects.   Third graders are creating with slabs in a variety of ways.  In one school we are making big mouth fish that will demonstrate the food chain.   In the other school we are talking about Adobe houses. After our research, we will create the walls of our houses and begin construction next week.  Our second grade unit will focus on owls and will incorporate the use of pinch pots to create owls.  We reviewed visuals of the different types of owls this week and began pinch pots for the body.  First grade students listened to the story of "Dave the Potter" by Laban Carrick Hill.   Here is a website about Dave.  They also learned the history of Southern Ugly Jugs.   They will use pinch pots and coils to create a personal ugly cup.  Kinders are experiencing clay for the first time through pinching, coiling and compressing clay.   Here are photos of a few of their beginning pinch pot.  Very good for a first experience!  I especially was impressed by the one in the left photo, bottom right.

Wrapping up the clay for week to week storage


Holding the clay from week to week is most definitely the most challenging step in working with clay in elementary school.   Wrapping the clay to keep the moisture in must be efficient or a student's piece will be dry by week two.   I'm planning to create a step-by-step poster for my students to remind them of the process for wrapping and will post it here when completed.   We wrap in plastic bags, making sure to remove as much air as possible, twist the top of the bag closed and secure with a clothes pin.  The pins are labeled with the student's name, grade and day of the week they are in art class.  Here is a photo of my storage method, my interpretation of a holding box.  It works fairly well.

My Elmo Set-up
I recycled an old projector cart that was ready for the trash heap

I am also enjoying the availability of my Elmo Document Camera this year.   I purchased it last Spring after the clay unit so this is my first opportunity to demonstate with the camera.  I am already seeing students exhibiting a better understanding of processes due to the increase visability of demonstrations.  I purchased my unit myself and naturally could not invest in two units so I only have Elmo in one school.   I feel like an on-going test study of the effectiveness of the camera and without the camera by comparing the successes of the two schools where I work.   Elmo definitely increases my effectiveness.